Wednesday, August 28, 2013

The most wonderful time of the year (according to me, anyway)

We are counting down the days until the first day of school. The kids, with disappointment. They don't want summer to end. But I'm counting down the days with excitement! Not only because the kids will be going back yo school, but because fall is my favorite time of year!

The days have that cool, crisp edge to them. Apple picking starts, my kitchen starts to smell like freshly baked bread and cinnamon, stews bubble on the stove, cozy sweaters come out of storage! Ahh, and our schedule, while busy, is at least somewhat predictable. 

So with fall in mind, I crafted a couple of cards using acrylic blocks as background stamps!


And I dug out some embellishments I had forgotten about. 

Watercolor paper helped mr achieve the messy look I was going for. 

Lots of color splashes, and another embellishment. 

Happy stamping!

Sunday, August 25, 2013

Impressive gift card holders

In our family, August is one of our big celebration months! That's because my sister-in-law, brother-in-law, and mother-in-law all have birthdays. And my in-laws celebrate their anniversary in August. So we find a day for all of us to gather and have one big party for everyone!

The party was yesterday. And true to form, I waited until the last minute to wrap their gifts. Thankfully, their gifts were all gift cards, and I had been working on a new gift card holder card! This was my brother-in-law's card, and he said it was the coolest card he'd ever seen! High praise indeed from a manly man!

To open the card you have to pull the belly band out from under the main image. And then you ate treated to a little surprise. A pop up card!

This one was for my mother-in-law's birthday, and for my in-law's anniversary.

It's a two-for! Because I had waited til the last moment to craft these cards, I was happy to combine two events into one card.

And this one was given to my sister-in-law.

Her husband said that the card was better than the gift itself! I've got to be honest, even though we were celebrating my family members, I felt like the superstar if the party!

Happy stamping!


Friday, August 23, 2013

Celebrate with me

Well, I've finally taken the plunge and opened my very own Etsy shop!

I've been busy setting up shop, taking pictures, and crafting some super cute cards! Please, stop by and take a look! I'd love to hear what you think!

Happy stamping!

Thursday, August 22, 2013

Note cards and gift holder

I've had some super cute patterned paper for years. I bought it for scrapbooking, but never used it. I thought that it was about time to put it to good use!

I needed a little gift, something with a personal touch, for a dear woman in my life. So I decided to make a set of note cards and envelopes. Because it was a gift, I had to come up with a cute little note card holder too!

The cards are 3 1/2" x 3 1/2", not a typical card size. So I made matching envelopes too! I can't wait to give them away!

Happy stamping!

Wednesday, August 21, 2013

Little notebook

I found a cute little pack of notebooks at Staples and, with it being almost school time, I bought them! But of course, I couldn't just use them as is. I had to pretty them up! I remembered a project that I had seen on good 'ole Pinterest, and I did my own riff on her idea. Here's the link to the original project.
http://brandyscards.com/stampin-up-secret-garden-stamp-set-notepad-cover/
This project couldn't be easier and it comes together quickly.

I made a matching card to slip into the pocket, just in case I want to use this as a gift for someone special!

Happy stamping!

Monday, August 19, 2013

Love in code

I was contacted by a customer looking for a very special card. She and her cousin have a unique way of communicating the love that they share. They don't say, "I love you." They say, "Yadda yadda!" Well, trying to find a card that uses their phrase is impossible! Unless, of course, you know me. So she explained what she was looking for. I worked with her and this is what we came up with!

My Cricut came in handy for the die cut letters. Using hearts for a couple of the letter a's reinforces the love theme of the card. And I used purple, blue and green because I didn't want it to be sickly sweet, or feel like a Valentine card with too much pink and red. 

Sometimes you want to send a message to someone that is unique to your relationship. Finding a Hallmark card that works is difficult in those situations. Keep me in mind! I'm happy to work with you to help you say just the right thing! 

Happy stamping!

Aqua and orange

Things have been busy around here! My youngest daughter was cast in the musical Grease as Patty, the perky cheerleader and this past weekend was show time! And before that was tech week. I've been living out of my car (rehearsals were forty minutes away, and with gas as expensive as it is, I didn't want to drive back and forth every night), so card crafting took a back burner. 

But now I'm back! My new favorite color combination? Aqua and orange! In this case, Pool Party and Calypso Coral. With some Riding Hood Red and Certainly Celery to boot. I had fun playing with sponging color using masks and negative space. I sponged the background first, and then did the butterflies. 

I clear embossed the swirls before adding the color to lend a sense of movement and whimsy. 

Happy stamping!

Thursday, August 15, 2013

Butterflies

I've been on a butterfly kick lately. I don't know why. Maybe it's because it feels like summer is winding down and I know I'll miss seeing them flitting around when cold weather settles in. Maybe it's because I just found out that a dear stamping friend abhors butterflies (!) and I'm trying to figure out why. I can't imagine anyone not liking butterflies! But there you have it. She does. Maybe it's because I love how adding a few butterflies to a project lends an instant feeling of motion to a project. 

In any case, butterflies have invaded my craft corner. And I like it!

Happy stamping!

Tuesday, August 13, 2013

Crisp and clean butterfly

Today, I had some fun with clear embossing, and sponging with Riding Hood Red, Calypso Coral, So Saffron, and a bit of Soft Suede around the edges of the butterfly. I've been playing around with negative space lately, and this card is my favorite so far!

I used Stampin' Up's Beautiful Butterflies Bigz Die and cut the large, complete butterfly from a piece of copy paper. I laid  the negative outline of the butterfly down  over a piece of Whisper White card stock that I had stamped with VersaMark ink and embossed with clear embossing powder. I sponged some color inside the negative space. And, voila! A beautiful butterfly emerged. 

I love how well the colors blend together! 

Happy stamping!

Addicted to circles

I admit it. I'm using this circle technique way too much! But I can't help it! It's so cool! 

This time I added patterned paper and a couple of butterflies to change things up a bit. 

Happy stamping!

Sunday, August 11, 2013

More circles

I just love how this card turned out! This time I glued down the circle flaps. And I only worked with one sheet of DSP. Same idea as my last post, but gluing down the flaps gives me a totally different look!

I cheated with the patterned paper mat. It's actually two thin strips of paper instead of one big piece. A little trick to stretch your favorite papers!

Happy stamping!

Saturday, August 10, 2013

Circle craze

Have you ever had a total failure turn into a happy little accident? I can't tell you how good it feels, when what you thought was an utter waste of time, turns into one of your favorite techniques! I'm on a creative high right now. And I think that I might use every pack of patterned paper that I own to make a version of this card!

I was originally going for a totally different circle look. And some day, I'll go back and give that look another go. But on the journey, I discovered this look and I'm in serious love. 

And it's versatile! From birthday to Christmas cards, the circles just look celebratory!

And even though they look a little fussy, a circle punch (I used a 1 1/4" punch) makes the work easy. 

A bit of sponging helps the circles stand up next to each other. 

I thought about gluing the edges down, but I decided that I love them sticking up!

Happy stamping!

CASEing cupcakes

I saw a card on Pinterest that I immediately fell in love with! And I decided that I needed to CASE it. Here's a link to the original card. 
http://ministamper.com/2011/09/10/cupcake-stepper-card/

If you've never heard of "CASE", in card making, it stands for "copy and share everything". Sometimes you come across a card that you just adore. And you have to have! So you CASE it!

I wanted to make a version that would work for a man, so I changed up the colors. A good friend of mine was telling me that she loves aqua and orange together, so I used Pool Party and Pumpkin Pie! Love this color combo!

Happy stamping!

Friday, August 9, 2013

Leaf love

I got some Gumball Green ribbon on special quite some time ago, and I wanted a unique way to showcase it. 

Ribbon leaves! Perfect!

Happy stamping!

Thursday, August 8, 2013

Merry Christmas

Here in the northeast, it's the height of summer. Or is it? I'm so confused because the temps have been in the lower 70's and at night, it's been downright chilly! My best friend has been posting on Facebook about sweaters, and hot cocoa, and scarves and gooey chocolate chip cookies. 

I'm the first to admit that summer is not my favorite season. I know. Crazy, right? I much prefer crisp autumn nights, apple crisp and home made bread in the oven, curling up under a blanket with a good book. And I go nuts for the first snowfall of the season! So, with the cool temperatures, my brain had wandered all the way to December. 

I stamped the leaf image from Simply Sketched in VersaMark ink. Then I embossed it with white embossing powder. I sponged on some Real Red, Always Artichoke, and Pear Pizzazz inks, and added some ribbon and mats. I had an old package of rub-on greetings and that was the finishing touch!

Merry Christmas in August and happy stamping!

Tuesday, August 6, 2013

A quilt in a day

Years ago, I bought myself a make-a-log-cabin-quilt-in-a-day book. I bought six different fabrics, matching thread, a rotary cutter and self healing mat. I spent a day cutting out the strips of cotton, perfectly straight and square. I spent the next day painstakingly sewing the strips together to make squares. I spent the next day ripping them apart because when I tried to piece the quilt top together, nothing lined up right. I guess my squares weren't as "square" as I thought! 

Needless to say, my quilt wasn't done in a day! I did finish the quilt, and it turned out beautifully. I even made a few more. Realizing that quilting was not going to be my forté, I passed the book on to my Mom. She has gone on to become a truly gifted quilter. At the last quilt show that she entered, she won a ribbon for her stunning piece! 


This is the closest that I'm going to get to quilting again! A little bit of work for big instant gratification! Mom's birthday isn't until March, but I'll be saving this beauty to give to her. I know she will just love it!

Happy stamping!

Sunday, August 4, 2013

Double inspiration

You might remember this card from the post "The ocean is calling". It's a card I designed for Stamp Camp. And I adore it. 

Stamp Camp was yesterday and the ladies and I had a fabulous time being creative. Some of my girls carefully read the instruction sheet that I print out for each project and produce a perfect copy of my sample. This makes me happy because they enjoy having a cute card to send to a loved one. 

Some of my girls don't bother with the instruction sheet and quickly bust out a card that kinda looks like my sample. This makes me happy because they enjoy winging it and seeing what happens. 

And some of my girls take a look at my sample and decide to turn it on it's side! They change up the layout, switch around the colors, and end up with something totally different from my sample. This makes me do a little dance of joy! They enjoy the creative process and aren't afraid to take a chance and get their hands dirty. 

Today when I was unpacking my Stamp Camp supplies, I discovered that I had an extra card kit. So I decided to get my hands dirty and make something entirely different from the original cards! Here's what I did with the ocean inspired card. 

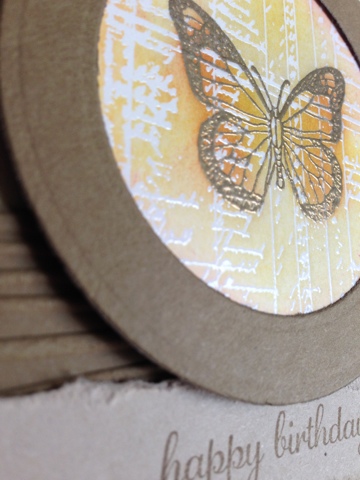
It's still based in nature and uses a bit of  wood grain, but other than that, this card and the original have nothing in common! This time I used VersaMark ink and embossing powders on the main image. Some tearing and the Woodgrain embossing folder lends a bit of texture. I am in serious love with this version too!

Happy stamping!

Saturday, August 3, 2013

Custom made

I've begun a new endeavor! I know a very crafty (She crotchets the coolest, unique hats. Think unicorns for little girls, and knight helmets for courageous guys!) lady who was looking for the perfect card for her best friend. Her friend was finally pregnant! The new baby is much longed for, and my friend wanted an extra special way to congratulate the new parents-to-be. 

So she contacted me and we discussed exactly what she was looking for in a card. She browsed through my blog and let me know what techniques and looks caught her eye. I combined all of that, and came up with this!

I sent my friend a few pictures so that she could see what I had done. Thank goodness, she loved the card! Of course, if she hadn't, I would have worked with her until she was happy with the new card. 

So now I'll pack up this little beauty with an envelope and she can send it to her friend! If you'd like a custom made creation, contact me. I'd love to work with you!

Happy stamping!